
Step 1: Get Tabletop Simulator
This is an easy one! Well, maybe not for your wallet. You can find the program here.
Tabletop Simulator’s MSRP is $20, but it is constantly on sale for $10. Whether that sale is directly on the Steam storefront or elsewhere, make sure you do some due diligence by Googling “Tabletop Simulator sale” before buying it.
You could also sift through a deals aggregate site like Slickdeals.

Step 2: Load the Marvel Champions LCG mod (Editor’s note: more mods are listed at the bottom of the article)
There are several Marvel Champions mods, but instructions with the “Crimson Mod” is how this tutorial will be framed.
The Hitch mod is more up to date.
All you need to do is log into your Steam account and hit “subscribe” on the Crimson mod page. It will automatically incorporate with the Tabletop Simulator program.

After loading up Tabletop Simulator, press “Create” and look for the Marvel Champions LCG mod in the main menu. A giant digital table will load, as will every deck and encounter set in the game. Custom content can be found above the main table (for the Crimson mod).
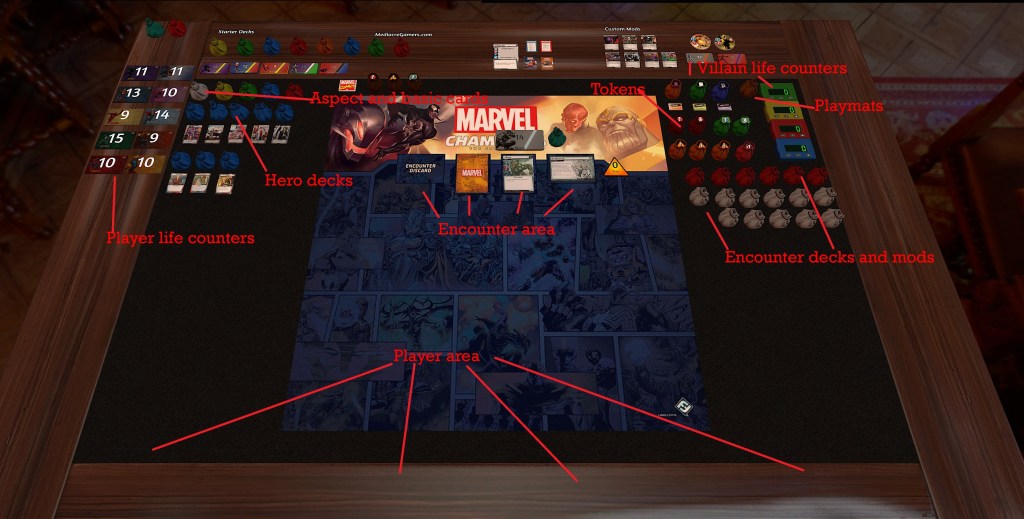
Step 3: Learn how to navigate the mod
Take a look at the image above (here’s a higher resolution version) to see where everything is located.
You can click and drag everything to suit your needs, or grab items out of the pouches by clicking on them and flicking the contents out of the bag. This is how you’ll grab hero, aspect, basic and encounter cards to build those decks.
Every card in the game is in those bags: if you take the time to learn where everything is, it’ll be a cinch to start a game.
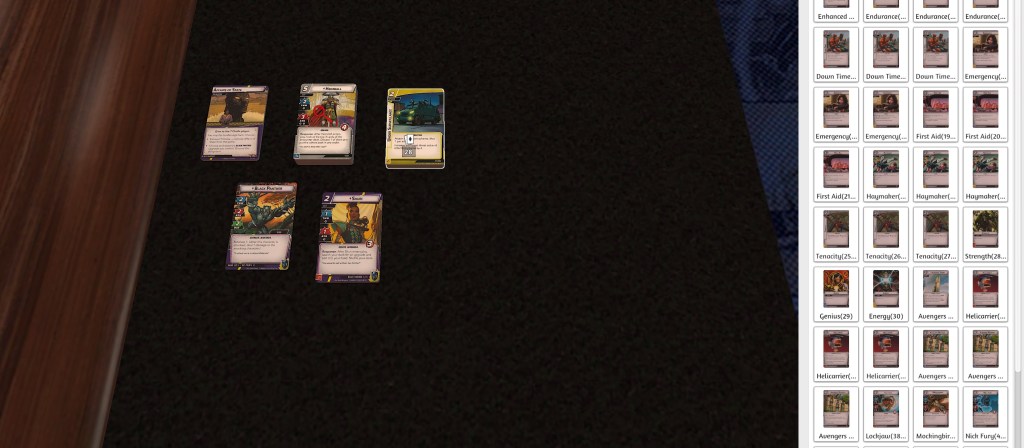
Step 4: Make your player deck
Making a deck is tricky at first, but once you get the hang of it, it’s as simple as making one in real life.
First, pick which hero you want to start with. Grab the hero card out of the appropriate bag in the top left. The card is double-sided and can be flipped with “F” at will when highlighting it. Then keep digging in the bag to find the 15 hero cards and the nemesis set/obligation. They are all different stacks so they don’t mix together at all once.
Decide which aspect you want to play with. All of the bags in the top left are colored by aspect (red/blue/green/yellow). Grab the stack of aspect cards, and grab the entire stack of gray basic cards too. Put them close to each other anywhere on the table, separate from everything else.
Right click on either the aspect or the basic stack, and select “search.” This will show each card available in each stack on the right side of the screen. Simply click and drag the cards you want onto the table or onto your hero deck of 15 to create your giant 40-card minimum deck. Repeat the process for the opposite aspect or basic stack, whichever one you didn’t do first until you have a 40 card deck. You’re done!
Mash all of the cards together into one stack (41, with the hero card) and right click on it: select “save object” and give it a name (Black Panther Justice, in the above case). Congratulations, you’ve saved your first deck! To instantly spawn it into an online game, have the lobby owner give you permissions and then select “objects,” at the top of the screen and click on “saved objects.” Then click the deck you want and it will appear in the game.

To initiate a game, assign yourself a “player color,” which allows you to have a hand that you can manipulate at the bottom of the screen. You can do this by selecting your name in the top right corner of the screen with “change color.” Red is usually the easiest to navigate solo, so start with that. Select red, with other players in the same lobby selecting different colors as needed.
To “deal” yourself cards based on the alter-ego hand size at the start of the game, hover over your finished deck and press the numerical value you need (usually 5-6) on your keyboard. It’ll automatically deal you six cards if you press the number “6” for instance. You can also highlight the deck and select “deal,” then your color on the color wheel to deal yourself a single card.
Now you’re ready to go!
Alternatively, you can use this mod from FunkyMonkeyMonk to build a deck.

Step 5: Make the villain deck
First, select which villain you want from the right side of the screen and set their life counter up to the appropriate amount. Then, grab the villain deck out of the bag on the right (as well as the standard set and optional expert set), select your modular set and move it onto the villain deck to merge them. Viola!
Press “R” to shuffle it all together, and “F” to flip the cards so that they are facedown and you cannot see them (if they aren’t already). To take cards off of a pile, “flick” them quickly off of the deck. To move the whole pile, deliberately click and hold. Flicking is how you’ll “draw” boost or encounter cards.
Also, don’t forget to grab your obligation card out of the appropriate hero bag and shuffle it into the encounter deck, while placing your nemesis set to the side.

Step 6: Play
Proceed how you normally would in a real game based on the Learn to Play booklet. Follow the setup instructions, play through your turn, adjust threat on the main scheme for step one of the villain phase by clicking on a counter to add threat, then flick a card off of the encounter deck for a villain activation and flick a card off the deck to deal yourself an encounter card.
Some of the most useful commands are:
- Left/right-click: Add or remove a digit from a life/threat counter.
- Ctrl+C and Ctrl+V: Copy and paste a bag or object. Useful for when you want token bags in each player’s play area to save time.
- 1-9: Deal yourself that many cards off the highlighted deck.
- Q or E: Tilt cards like you would be exhausting them in real life. Also useful for slotting in side schemes when they roll off of the encounter deck vertically. For the best results, change the “degree” symbol at the top right of the screen to 90 degrees (90°).
- L: “Lock” an item so that it doesn’t fly around if you accidentally grab it.
- G: “Group” items together. Useful for selecting several stacks of cards and making them all one pile.
- F: Flip cards when they need to be revealed, or need to be face down.
- R: Shuffle a deck. Works with both player and encounter decks. You can mash R to rapidly shuffle cards for fun.
- + or -: Make something bigger or smaller (useful to scale cards to the size of your liking). If the numpad + and – keys aren’t working, try them on the numerical row above your QWERTY lettered section.
- Tab: Point at something on the table, useful for multiplayer when you’re talking out a turn. You can also hold tab to draw a line with the ruler tool to further make your point.
- Alt: Make an object appear bigger for a moment on-screen. Useful for reading detailed cards you may not have memorized yet.
- Save game: Click on “games” (the dice icon) at the top of the screen, then press save and load. Then press “create” and save your game with as many descriptors as possible so you remember it.
Need more help? You can watch this wonderful original tutorial video by Mediocre Gamers, as well as an updated “version 2” guide here.
Other options
Hitch’s Marvel Champions Table is one of the quicker mods to get updates
Another mod option is the “scripted” mod by PwnStarHero.
Or this “Complete” mod from Ducspeed.
Or this mod from L8 Night Gaming.
Or, you can check out the new off-site updated OCTGN page here or its the GitHub link here. OCTGN isn’t as flashy, but is much easier to setup and learn. It’s also free.
There’s also a LackeyCCG module!
It goes without saying: make sure you own the decks and support the growth of Marvel Champions.
